The Minox camera, made in Germany, was very popular in the late 50s and early 60s. The camera made slides that are tiny: 8x11mm. Hold it to the light and you can barely see what is in the image.
My dad left me a box of 650 Minox slides. These are from 1962 to 1964. I called and visited camera stores: none had any idea how to look at these. One place offered to scan them for $6.50 per slide. That'd be $4,225.00. Yeah, right.
After a few days, I came up with a solution. It's not beautiful, and the quality is just okay, but it works. I finally saw photos that nobody in our family had seen for more than 50 years.
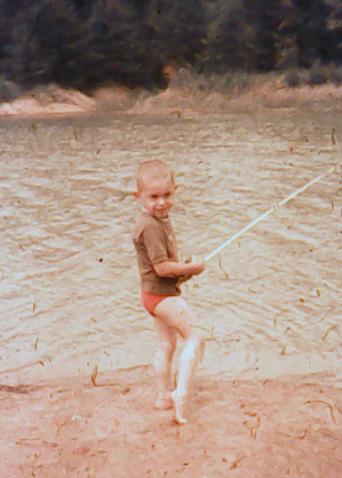
Minox Slide, enlarged with a digital microscope
What You'll Need
- Jiusion Digital Microscope. Available at Amazon for $19. Just plug it into your cell phone and it works.
- A bright LED white light, such as a gooseneck desk lamp (it must be an LED light, otherwise, it'll become too hot)
- A small cardbox box that fits over the lamp
- A few square inches of plastic from a white plastic supermarket bag
- Tape
- A sharp knife (like a box cutter)
- Image editor software, such as Photoshop or PaintShopPro
How to Digitize the Minox Slides
- I used a desk gooseneck lamp. I rotated the head so the light pointed up.
- I found a small cardboard box that fit over the head. With a bit of trimming, it sat flatly on the lamp.
- In the center of the box, I placed a Minox slide and drew an outline.
- Don't cut the box to the same size as the slide. The slide should not fall through.
- The slide film is very small: 8x11mm, about a quarter inch by half an inch. Cut a hole a bit larger than that. The exact size doesn't matter. The hole should be large enough that when you set a slide over the hole, the light shines through.
- To smooth the light, use the white plastic. Cut two squares from white plastic bag that are larger than the hole. Use tape to stick the squares to the bottom of the box. Tape one side and then pull the other side to get a smooth, tight surface. I used two layers to get an even light.
- Put the light box over the lamp, turn on the light, and you have light box. (It's better if you turn off the lights in the room.)
- Place your first slide over the hole.
- Use the USB cable to connect the Jiusion microscope to your phone (I used a Samsung Note 8; it also works with iPhones).
- Use the Jiusion microscope to look at the slide. The image shows up on your phone.
- To avoid shaking or movement, I used the phone camera voice trigger: say "cheese" or "smile" and it takes a photo.
- Once you get the hang of it, you can go through the slides quickly. Many photos are irrelevant, repetitive ,or uninteresting; you can ignore those. Take photos of the interesting slides.
- To be honest, I doubt anyone is ever going to look at the slides again, so I just dropped them into a shoebox.
- When I had photographed all of the slides, I connected the phone to my computer and moved the photos to the computer.
- I also made a backup folder for safety.
- I opened the photo editor (I use Paintshop Pro; you can use Photoshop or whatever you have).
- I improved the images by rotating the photos, cropping, and sevearal light balancing filter and various other filters.
- I emailed digitial photos to my family. They were amazed to see these photos. Photos of puppies and cats they had forgotten, many places we had been, and so on.
Tip: Use PNG, not JPG, for the Image File Format
The JPG file format is a "lossy" format. It was popular for early phone cameras because it compressed images. A two megabyte photo was compressed to 200 kilobytes, which allowed more images on limited memory.
But modern cell phone cameras have gigabytes of memory, so file compression isn't needed. This allows cameras to save images in PNG format.
- The disadvantage of JPG is that every time you make an edit, the image is compressed again. 2MB turns into 200 KB. Save again and it becomes 50KB. Save again and it becomes 20KB. The image quality degrades and the image becomes fuzzy. Colors are flattened.
- The advantage of PNG is that every time you make an edit, the image is not compressed. The quality stays the same.
- By the way, check your camera's settings and set it to PNG, not JPG.